Monday, August 12, 2013

Illustrations: Baby Cards

Here are a couple of pictures I did for some baby cards. My cousin has just had her first baby, a gorgeous little girl called Mary, so I did a design for a card for her, and then one in the same vein to congratulate the new grandparents.

I wanted something a bit retro, so I looked to 50s artists, especially Retta Scott's Golden Book version of Disney's Cinderella. I used some sort of pastelly live brush in Photoshop to get the chalky texture. 
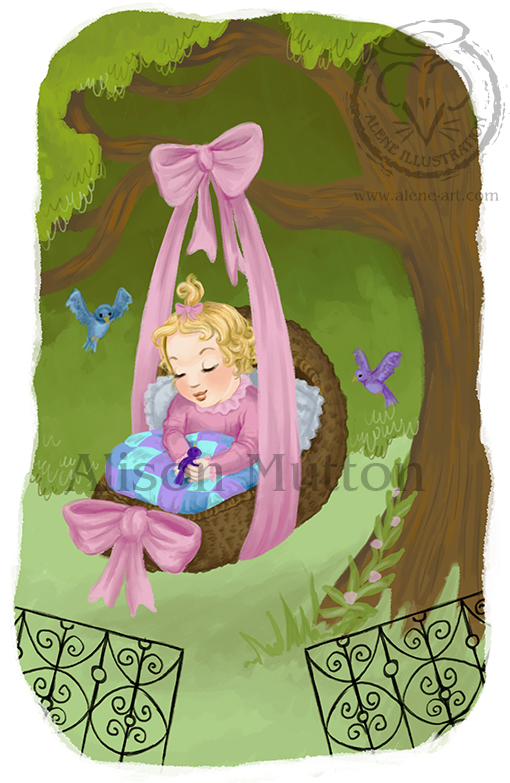

This card used the 1805 version of 'Rock-a-bye Baby' on the front and inside.

Rock-a-bye baby
Your cradle is green
Father's a nobleman
Mother's a Queen

Which seemed a bit less confronting than the usual version, especially for very new first-time parents! 

The Grandparents card was a bit of an afterthought. My mother wouldn't let me use the same illustration, and I had a lot of work on, so to speed things up I swiped the pram from some baby shower invitations I did last year and drew over that with my chalky brush, and altered the face of my original baby a bit. 


Adobe Photoshop CS6 with a Wacom Intuos 3. 

Saturday, August 3, 2013

Needle felting: Mice

Contrary to appearances, I am not dead! There may have been times over the last month when I wished I was, because sometimes life/work/the world does that to us, but I've managed to survive July relatively unscathed and now that it's August I'm back with some felted mice.

I posted a sneak peek of this as part of a sketchdump back in May but only finished it recently. Back then there was just one mouse, but I always intended there to be three. I could probably go back and tighten up some areas, but I think it's time to call it done:


A shot with my hand, to show size.

And a rotation, because plump mouse bottoms need to be seen at every angle. =P


And finally a shot from above:


Merino & Corridale wool with what I assume are #32, #36 and #38 felting needles. 

Monday, July 8, 2013

Needle Felting: Tawny Frogmouth

This was a gift for one of my honorary Aunties. She loves owls, especially tawny frogmouths, which are a type of owl here in Australia, and asked if I would felt one for her. 

Here we have it in its natural habitat, blending in rather well. A real tawny frogmouth can camouflage itself to look like a branch, but they're much cuter when they're fluffy. 


Apart from the eyes and beak, everything is felted with only a beige-brown and black, and I did my best to create the illusion that I had more colours by mixing the two. 
This is felted a bit more loosely than my usual projects – I usually have very solid final products, but I wanted a hairier, softer result this time. 


It's not very large and sits comfortably in hands or on a desk:


I took some progress shots with my phone while working on this project, so here's a compilation. See below for an explanation if you want more detail:


I started out making an armature for the feet with copper wire, and then felted them and attached a mound of core wool on the top for the body. I'd joined the feet together with a horizontal stretch of wire, so I could easily attach them by felting around this without the need for glue. 

I then started covering the core wool with brown, and added some extra height. After that I had to start on the face because I always like to have a face done while I'm working; I find it easier to create around a face than to later try and match a face to everything else. It looked a big creepy for a while there, but eventually I ended up with something cute. 

I then turned to the back view and added a tail and wings, which I felted separately and then attached. 

I had a monkish owl for a while as I felted a couple of layers of individual feathers and then covered the remainder of the owl with unfelted hanks of roving, which I rooted in, starting at the bottom and working up towards the top and centre. After that all that was left to do was to trim the furry bits and attach the flyaway eyebrows a bit more. 

Wednesday, June 26, 2013

Sketch dump

Here's a quick portrait I did of Mick Aston, Time Team archeologist, who died yesterday. I love Time Team, such a shame it was cancelled, and also a shame that he died so relatively young. Time Team is one of those shows that teaches a lot without requiring massive concentration (perfect for those times it's on tv when I have to cook dinner at the same time =P) and I've always found the archeology very interesting, although I admit I first started watching because of Victor Ambrus' truly gorgeous illustrations (also a crying shame that those were dropped in the final couple of seasons). 


Photoshop CS6 with a Wacom Intuos 3, about an hour and a half.
This was a good opportunity to try out whiskers in this lasso-and-shade style. 

And here are some recent pages from my sketchbook:

A very quick sketch (15 minutes) of Queen Victoria in her wedding dress, from an 1847 portrait by Franz Winterhalter:


A sketch inspired by a mother and daughter I saw queuing for Japanese:


And a couple of kids that were at my cousin's baby shower:


All of those are 0.5 #B mechanical pencil in a Moleskine Skethbook.

Sunday, June 23, 2013

Needle Felting: Sheep rattle

One of my cousins is having a baby, and today we went to her baby shower. Never being exactly what you might call flush with cash, I thought it might be nice to give her a handmade gift, so I put together a felted rattle. They don't know if the baby is a girl or boy, so I went unisex on the colours, and her maiden name is Mutton, so I chose a sheep as the base. 


This was quite a learning curve, as I incorporated wet felting, and also learnt how to bleach wool using a mild peroxide solution, which got me a much nicer, creamier colour from the natural wool that's been sitting greasily in the back room for 20-odd years. 
I didn't have a rattle insert, so had to compromise with beads in a plastic capsule – which was really far too big, and very difficult to felt around. If I'd had a smaller insert I would have been able to make the sheep more of a cloud shape. 


The beads and basic shape of the sheep were roughly needle felted, and then chucked in the washing machine and wet-felted. I then needle felted the brown and the details on top. 

The front of the sheep, the side I'm happiest with, is awake:


And the back side is asleep. This side didn't work as well as I planned, but I don't think it looks too bad. 


The beads are sewn on six times with doubled and quadrupled heavy-duty thread, and then the stitches were felted over and the beads felted together, so it's pretty sturdy. The details have also been felted in really tightly. 

Merino and Corridale wool with 'fine' and 'coarse' needles.

Thursday, June 13, 2013

Design: Save the Dates

Here's a look at some Save the Dates I designed recently for a lovely couple – I'll be doing the rest of their wedding stationary in due course, but these were the first things up. 

The floral design and colour scheme will be carried throughout the paper goods, and the Save the Dates have a watermark illustration of the ceremony venue behind the text.


Here's a clearer look at that illustration. I did an image search for a lot of potential views of the building, and they chose the one they liked the best. It was very, very small and fuzzy and had trees in the front, but I was able to create something new from it, using clearer photos to work out the details:


I also put together a monogram for them to use with wax seals on their envelopes. I made up a .ai file in Illustrator, and it was sent to the folks at the Wax Seal Shop. The seal-effect here is just a mockup in Photoshop.


Save the Dates put together in Photoshop CS6 with a Wacom Intuos 3 and printed with an Epson Artisan 730 on Coco Linen Ivoire 130gsm.  

Wednesday, June 12, 2013

Illustration: Traindriving Princess

I always quite liked this sketch from 2011, so I cleaned it up into a proper illustration for my portfolio, still using a limited colour palette. 


For this I created all the main base shapes in Illustrator, using the perpective guides to help with the train. Once I'd done that I took it into Photoshop and scribbled over everything and added the details.

Illustrator CS6 and Photoshop CS6 with a Wacom Intuos 3. 

LinkWithin

Related Posts Plugin for WordPress, Blogger...